Getting Started: Identifying Your Tractor's Year and Model
Before diving into wiring diagrams, accurately identifying your Ford 9N, 2N, or 8N tractor's year and model is crucial. Your tractor's serial number, usually found stamped on the engine block or transmission case, is your key. This number precisely identifies the year and model, which is vital because wiring configurations varied slightly over the years. Using the incorrect diagram can lead to significant problems. Pay close attention to serial number 263844, which often marks a notable change in the 8N's electrical system. Documenting the serial number with a photograph or written note is highly recommended. Have you ever been frustrated by incorrect information? Accurate identification is the first step to avoid this.
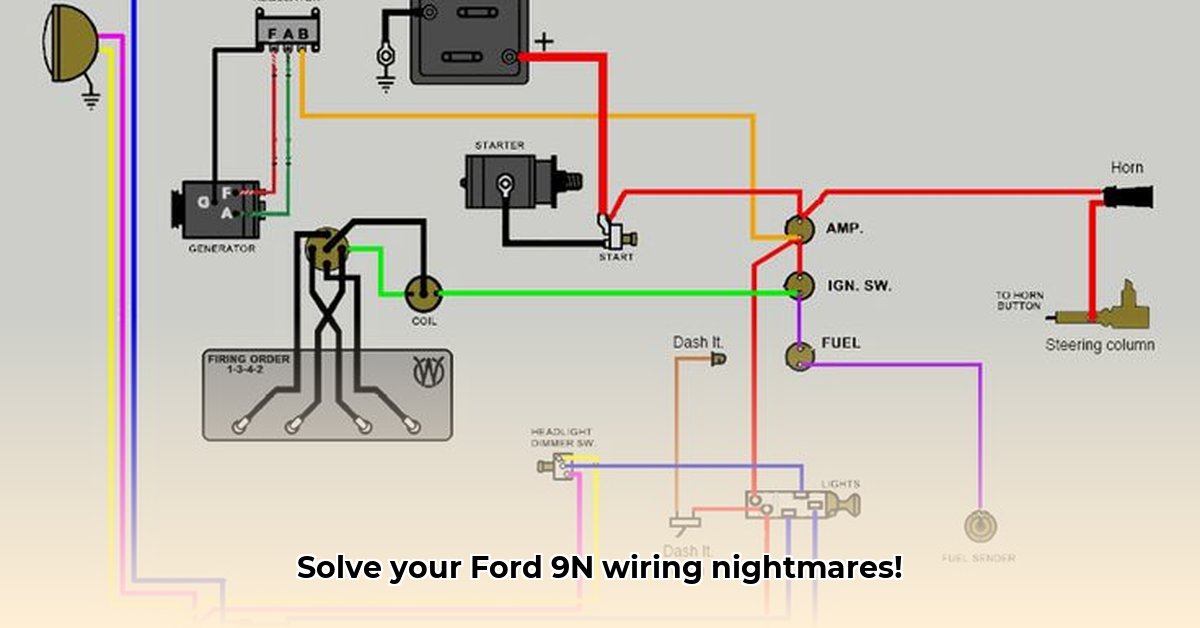
Understanding Your Tractor's Electrical Parts
The Ford 9N's electrical system, while seemingly simple, involves several key components working together:
Ignition Coil: This transforms low-voltage battery power into the high-voltage spark needed to ignite fuel in the engine's cylinders. (Think of it as the power booster for your engine's spark.)
Distributor: This times the delivery of the high-voltage spark from the coil to the spark plugs, ensuring proper firing order. (It's the precise timing mechanism for the spark plugs.)
Generator/Alternator: This maintains the battery's charge while the engine runs. (Keeps your battery charged while the engine is running, preventing a dead battery).
Switches: These control the lights, starter, and other electrical functions. (These are the on/off controls for the tractor's various electrical systems).
Wiring Harness: This is the network of wires connecting all the components. (Think of this as the electrical highway, carrying and connecting the signals to other parts of the tractor.)
Understanding these components is fundamental to troubleshooting any electrical issues. Did you know that a single faulty connection can cause multiple issues in your tractor's electrical system?
A Harmonized Ford 9N Tractor Wiring Diagram
Inconsistent wiring diagrams are a major hurdle for many Ford 9N owners. This guide presents a harmonized diagram, meticulously compiled from various sources, and corrected based on known inconsistencies.
(Space for a high-resolution, zoomable wiring diagram would go here. The diagram should be clearly labeled, color-coded for different circuits, and display any known variations between early and late models, especially around serial number 263844.)
This diagram serves as your comprehensive roadmap for understanding and repairing your tractor's electrical system. How much time and frustration could this save you?
Step-by-Step Troubleshooting Guide
Most electrical issues stem from simple problems like corroded connections or failing components. Follow these steps:
Safety First – Disconnect the Battery! Always disconnect the negative (-) battery terminal before any electrical work. This prevents shocks and shorts. (Absolutely crucial for personal safety).
Visual Inspection: Examine the wiring harness for broken wires, loose connections, or corrosion. Clean any corroded areas with a wire brush and electrical contact cleaner. (A careful visual inspection often reveals the source of the problem.)
Testing with a Multimeter: Use a multimeter to test circuit continuity and voltage. (A multimeter is an essential tool for diagnosing electrical issues.) Follow your harmonized diagram to identify the points where you need to measure voltage and continuity. Your wiring diagram will guide you as to where and how to test.
Replace Faulty Parts: Replace faulty components with genuine parts. Using substandard parts can cause further problems. (Quality parts are essential for a reliable repair)
Reconnect and Test: After repairs, reconnect the battery and test all electrical systems. (A thorough test ensures everything is working correctly).
Safety Precautions: Working Safely with Electricity
Electricity is dangerous. Always disconnect the battery's negative terminal before working. Use insulated tools and never work in wet conditions, and protect your eyes with eye protection.
Tools and Resources
| Tool | Purpose | Source |
|---|---|---|
| Multimeter | Testing circuits, voltage, and continuity | Auto parts stores, hardware stores, online retailers |
| Wire strippers | Removing insulation from wires | Same as above |
| Crimping tool | Securing electrical connectors | Same as above |
| Wire brush | Cleaning corroded terminals | Same as above |
| Replacement Parts | Replacing faulty components | Tractor parts suppliers, online retailers |
Restoring your Ford 9N's electrical system requires patience and attention to detail. However, with this guide, you'll be well-equipped to tackle the task safely and effectively.